Making a Master

Two years ago I wrote a blog post on Sand Casting Medallions. For that project, I already had a master for the medallions that I wanted to cast.

This year, I wanted to cast another dozen medallions for the Kingdom (for a different award) but I had no master. So I thought it might be helpful to document the process of making one. Please note that this process is for sculpting a clay master. There are other ways to make masters, but this is the one I learned.

Here are some of the materials you will need:

  • Sculpey brand oven-bake clay (other brands, such as FIMO, work just as well but Sculpey is readily available at almost any store with a craft section)
  • Aluminum ring molds or a similar two-piece frame
  • Another medallion with the desired thickness for comparison

You can also use this same medallion to outline a circle in your clay. In this case, we actually used the black circle pictured above – it’s a 50mm Warhammer 40k base that served as a cookie cutter for the clay. If you don’t know what 40k is, you’re welcome.

It’s important to remember that the clay master you create must be able to fit inside of your ring molds, so keep those nearby for comparison. I used a 50mm medallion inside a 60mm ring mold, which gave me enough wiggle room inside the mold.

I’d also recommend tools for sculpting clay. There is a 52 piece set available on Amazon here. For this project I used a tiny blade and a dotting tool.

Once you have your materials, break off a chunk of the clay. I started with a piece that I rolled into roughly the size of a ping-pong ball. Once you’ve rolled your clay into a ball, set it on a non-stick surface like wax paper. Then, use a rolling pin (or any other tool with a long, tube-like handle) to roll your clay flat, trying to create as even of a surface as possible.

Once you’ve rolled the clay to your desired thickness, use your circular or cookie cutter type object to form your medallion and remove the excess clay from around the edges.

You can see the clay circle that I created in the picture below on the right. Now is when you can compare the thickness of your clay to your other medallion. I got lucky and managed to roll my clay to the exact thickness that I wanted on the first try!

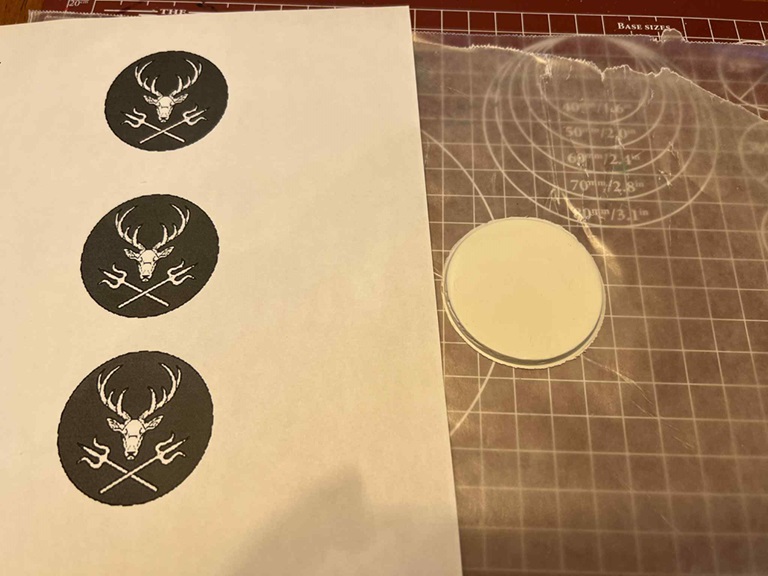
For this design, I printed off a number of different sized images so I could best match the size to my piece of clay. Once I matched the size of the image to the clay, I cut it out. I then cut out the design itself, so it looked like this:

I cut out the stag’s head and the tridents.

This will serve as a pattern for the medallion’s design. The next step is to carve out the design from the clay.

Here is the clay medallion after I carved out the design.

I want to note here that again, this is just one way to transfer a pattern to clay. One other method is to trace your design or pattern onto a second piece of flattened clay and then lay it over your medallion shaped clay.

Here is what that looks like:

This clay master was made by my husband.

Both methods work, it really just depends on the style or look you want.

Once you’ve finished carving your clay, you need to bake it according to the package instructions until it hardens. This baked piece of clay will then serve as a rough first draft of your master. Then just follow the usual steps for sand casting, using the clay medallion first.

Here is the first pewter medallion cast from the clay master.
Here, the edges have been trimmed.

Once you have that first pewter medallion, you will want to clean up the design so it can serve as your permanent master moving forward. To clean up the medallion, trim the edges with metal snips, files, and a jeweler’s saw to create a smooth outline. For the recessed portions, carve out the design to have a bit more depth with a rotary tool, hand engraver, or files. This part is extremely important and will make for cleaner casts.

A quick side note, clean up is my least favorite part of casting so I usually ask my husband to do that for me. I’m very fortunate to live with someone who has their Laurel in metal working and is willing to teach me casting.

Final product – note that my husband sanded it fairly smooth, which will allow for easier releases from the mold in the future.

Now you can use your pewter master to cast as many medallions as you need!

A(nother) Rapier Prize Box

In May 2024 my husband asked me if I could paint a prize box for our friend, Lord Aleksandr Tomasovic, who was fighting his prize fight to advance to rank of Free Scholar within the Academie d’Espee of Atlantia. This is the second box I’ve painted for this purpose.

This time, I chose to paint the box in a style that would match the recipient’s persona. In this case, Aleksandr has a Rus persona, so I chose a style with Russian origins – Mezen wood painting.

I’ll also admit to being a bit selfish here – I really love the look of Mezen folkart. Before I started this project I knew that finding documentation to support it’s existence pre-17th century would be challenging, but I went with this style anyway.

I did eventually find research dating the carving of nature and animal motifs in the Mezen region to the 12th century in Folklore and Folk Art of Russians of the European North (Dmitrieva, 1988, pg 114). The same book also describes how it was common for homes, especially on doors, doorframes, and window frames to be painted with similar symbolism, with historic examples from the 1800s. Based on this information, I find it plausible to extrapolate that this style of wood painting is older than the year 1600, but I was unable to find any documentation of early examples.

This lack of documentation could be for a number of reasons. One of which is that this style of painting was typically used to decorate domestic items of the non-ruling class. These items were typically not a priority for preservation or study. Another reason could be that this painting style was exclusively used on wooden mediums, which also makes pre-17th century preservation a challenge, especially in harsh climates and areas prone to fire. Lastly, we know that Socialist Realism became the only state-sanctioned art style for 60 years (starting in 1932), which led to the destruction of both religious and folk art styles across the Soviet Union (Rohotchenko, et al., 2022).

I also think it’s important to note that while we may not have any evidence of this painting style in period, the symbology used almost certainly goes back to ancient history. A notable example of this type of symbolism can be found in the reindeer depicted in the White Sea Petroglyphs. These petroglyphic reindeer share many stylistic features with the much later Mezen paintings and depict similar scenes.

For anyone interested in the symbology used in Mezen art, this is an interesting site to visit, though it is in Russian so it will need to be translated, but does include additional sources.

A series of barrels painted in the Mezen style. Source.

I didn’t take many progress pictures for this project, but the process was the same as the one used for this box.

In short:

  • Sand the box smooth.
  • Coat the entire box with gesso (serves as a basecoat).
  • Depending on how bright you want the colors, coat the entire box with white acrylic after the gesso has dried.
  • Go to town with your design!
  • When finished, use a spray lacquer to protect the paint.

The finished box was presented at Hawkwood Baronial Birthday.

I painted weasels on the front of the box to represent Aleksandr’s heraldry.
The (derpy) cat represents his wife, Signy’s, heraldry.
The back of the box.
The bird represents Aleksandr’s son. I asked Signy what animals their son likes and this was one of the options.
The top of the box.
The inside of the box was left plain. The sticker was added by my husband.

Because of the intricacy of this particular style of painting, I used a combination of regular acrylic paint and brushes, acrylic paint pens in various thicknesses, and sharpies.

Overall, I’m quite happy with how this project turned out. It was a fun way to try out a new art style and get a little creative!

References
Rohotchenko, et al. (2022). Socialist Realism: An Instrument of Class Struggle in Ukrainian Fine Arts and Architecture. https://philpapers.org/rec/ROHSRA-2