Extant Garment Challenge: Pre 1600

My dear friend, Baroness Jane Fox (OL), organized an extant garment challenge via social media back in November 2022 with the goal of recreating an original garment or accessory.

For reference, here is the description of the challenge and link to the Facebook Group:

This group is dedicated to the Extant Garment Challenge, where participants can recreate an original article of clothing or an accessory from before 1600. Any region and period is acceptable.

While this group is SCA focused, you don’t have to be in the SCA to be in the group.
The challenge starts in November 2022 and will end in Fall 2023. Participants can choose to display or just gather together in Atlantia at October Coronation or November Crown Tournament. I also suggest posting your creations online for everyone to enjoy!


You don’t have to make a close reproduction, simply use the original pieces as inspiration and then recreate them within your budget, ability, and taste.


Please share your ideas and assist others!


I have created a Pinterest board for ideas and will try to make it so anyone can post in it. https://www.pinterest.com/jezandjane/extant-garments-pre-1600/


This challenge is hosted by Baroness Jane Fox, OL, Barony of Tir y Don, Kingdom of Atlantia.

https://www.facebook.com/groups/685674066263768

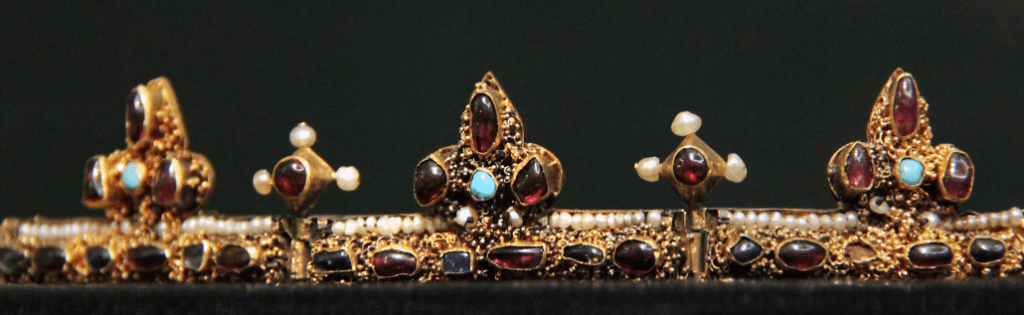
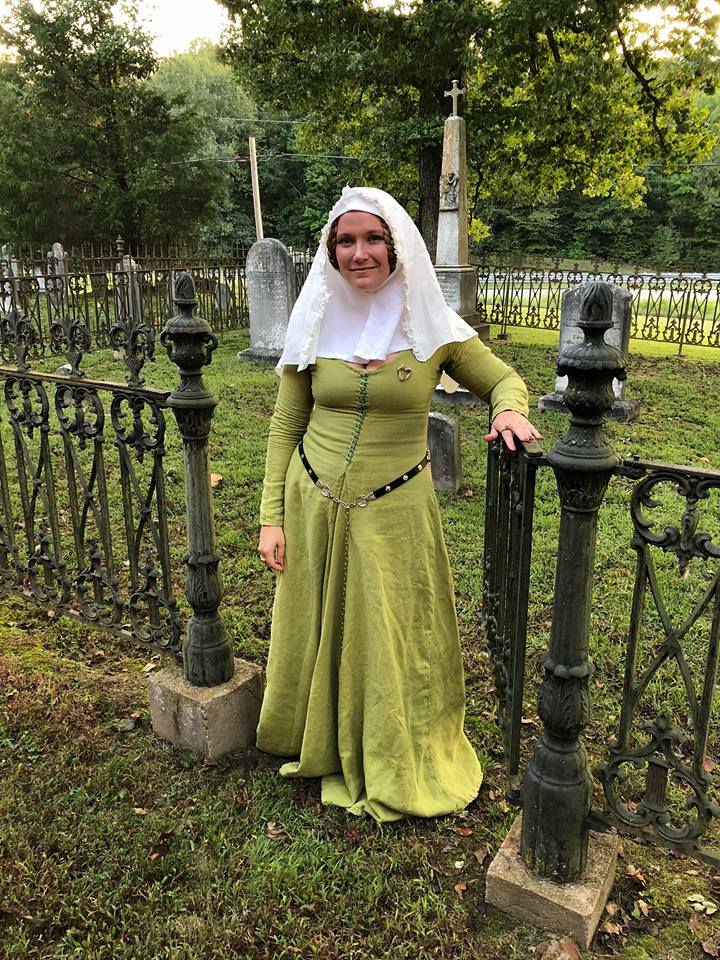
After visiting Baroness Jane’s Pinterest board I chose to recreate the surcoat of Eleanor of Castile, who lived from 1200-1244.

This image of the surcoat was taken from Pinterest and I do not, unfortunately, have the source. However, a high resolution photograph of the surcoat can also be found on the Patrimonio Nacional museum website.

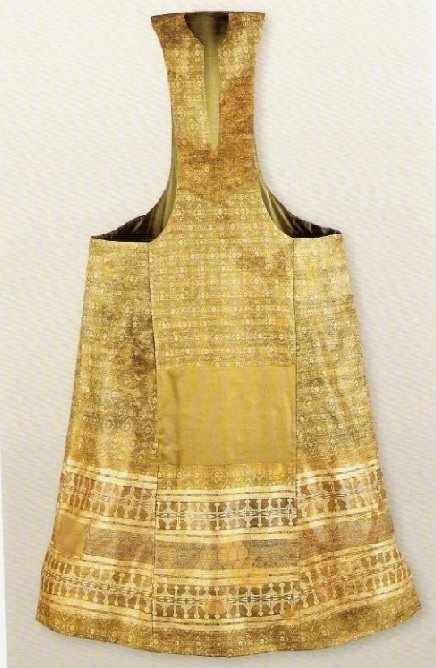
I used the image from the Patrimonio Nacional museum website as my primary visual inspiration, but I also used information and details from other articles, books, and blogs.

After doing some preliminary research on the garment, my first task was to source the fabric that I wanted to use. I was super excited to see that Sartor had a Spanish brocade from the 13-15th centuries for sale in very similar colors to the extant. I bought 5m (16.40 feet) of the fabric, which comes at a width of 74 cm (29.13 inches).

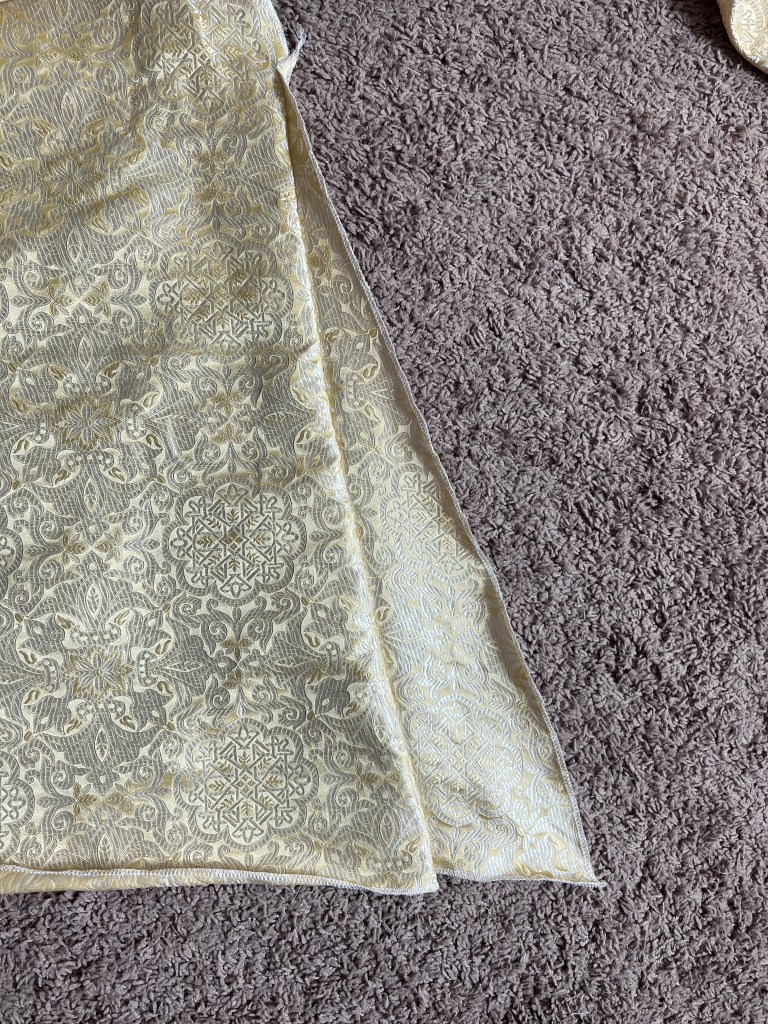
While this fabric would be perfect for the primary pattern I still needed additional fabric or trim for the bottom of the surcoat, as well as a fabric for lining. I did end up purchasing a sari from Etsy, as well as setting aside some other sari fabric that I had left over from my Roman garb in hopes of finding a good match for the pattern at the bottom. For lining I decided to use a beige silk that was also purchased from Sartor.

After my fabric arrived it was time for construction! Lucky for me I live very close to Baroness Jane, who was able to help me with patterning and recreating the surcoat over the course of a weekend.

Our first step was to brainstorm how to pattern the fabric in a way that resembled the extant piece as much as possible. One of the things I found interesting about this garment is how obviously the pattern on the fabric does not line up at the seams. To our modern eye this is quite jarring and unattractive. But seeing this on an extant piece leads me to believe that the priority was conservation of fabric, even when worn by a Queen.

Despite this feature my goal was to have the pattern line up as much as possible. With that in mind, Jane and I brainstormed a variety of pattern possibilities using my hip and shoulder measurements as a starting point. The other measurement we needed to consider was the bottom hem as the kirtle that it would be worn with has a hem of over 200 inches.

Brainstorming!

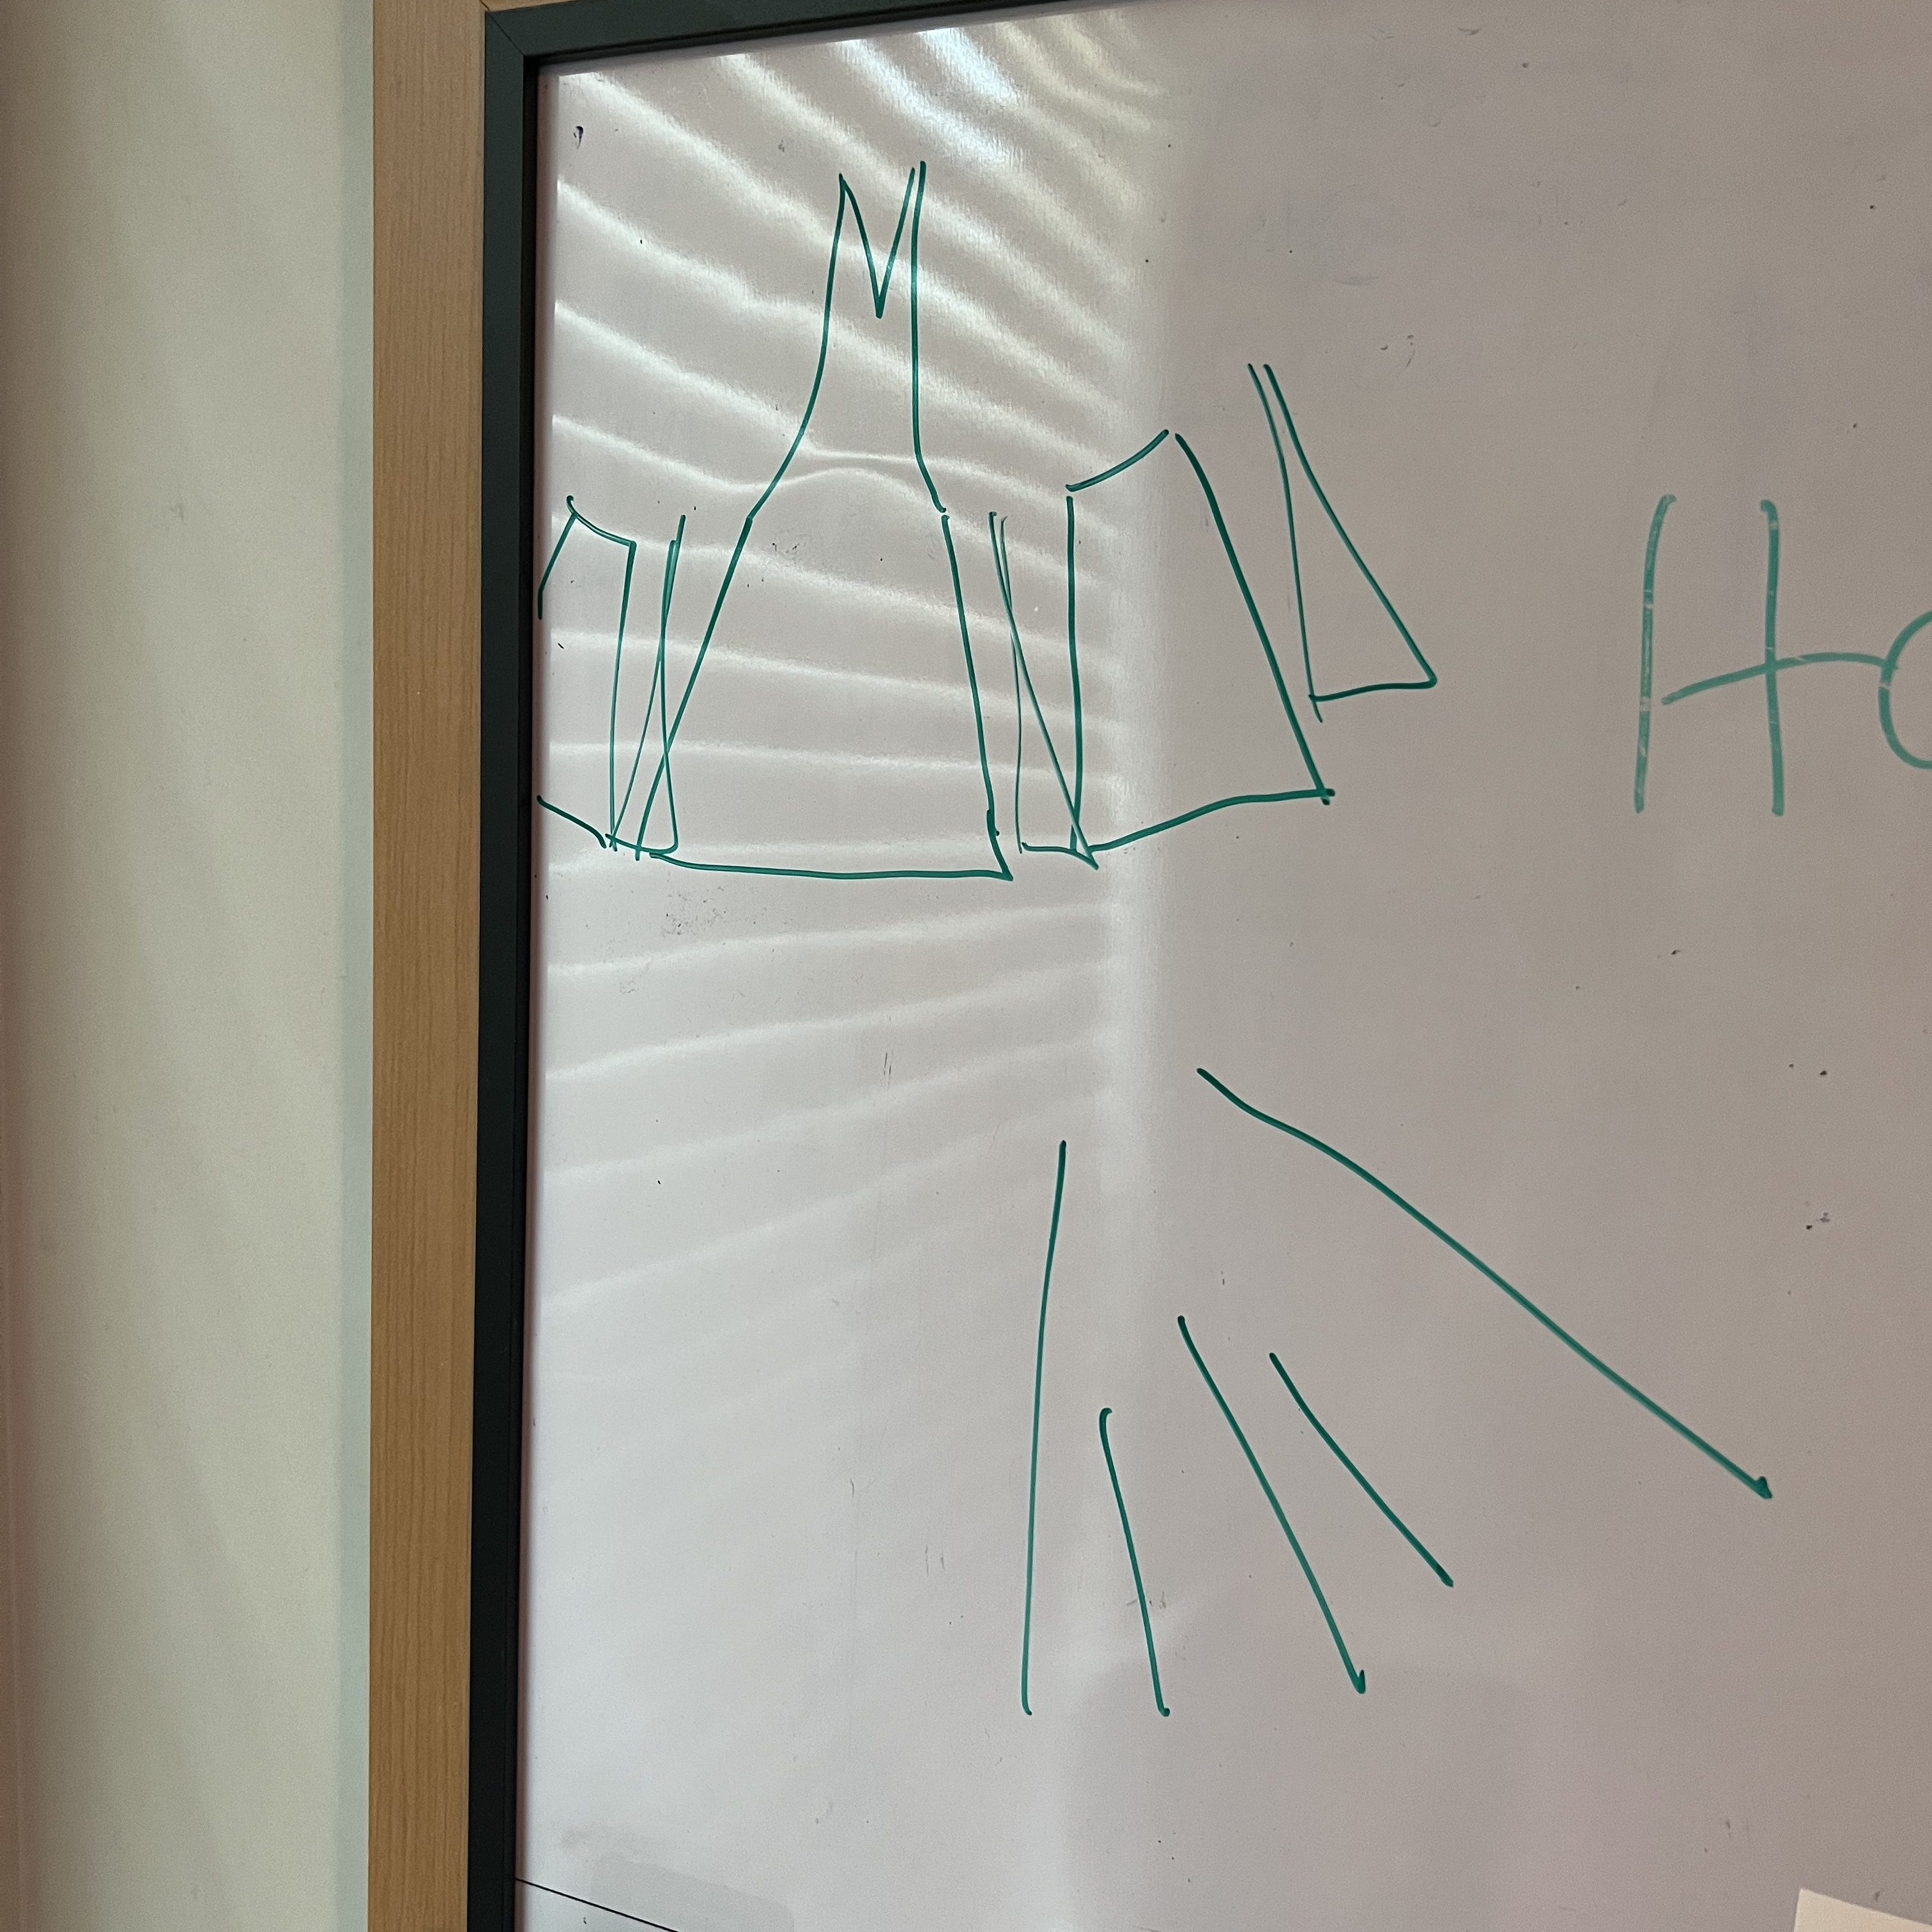
The image above shows our brainstorming process, featuring a picture of the extant dress, some sketches in pencil, pins, and three measuring tapes. We also compared the pattern of the extant piece to another common surcoat pattern. That pattern typically features gores, however the extant does not have gores. Instead, it has four – what we referred to as – “trapezoid” shaped pieces – two in the front and two in the back.

Some preliminary sketches on the white board. You can see we played with the idea of adding gores to get more fullness in the skirt.
The final pattern with preliminary measurements.

In the end, we did not add any gores. The measurements worked out perfectly so that the bottom hem was wide enough at 116″ to accommodate the underdress.

Final measurements.

Despite all our efforts to plan the pattern as perfectly as possible mistakes were made! Two of the trapezoids were initially cut the wrong size, while two others were cut with the selvage on the left instead of the right. Luckily we were able to cut and piece the mistakes and fix the pattern!

We had to recut and piece together two of the trapezoids so that the pattern would be correct. The pieced section is at the bottom of the skirt so it is nearly invisible now. Remember, piecing is period!

The last step of patterning was shaping the neckline and side openings to match the extant garment.

Cutting the neckline. You can see the side has been shaped, as well, so it is no longer completely straight.

We didn’t take any measurements of this process. Instead, we more or less eyeballed the look we wanted by trying the surcoat on over the kirtle and shaping it to match the neckline and emphasize the bust and waist.

Final fit over the kirtle to mark and hem the bottom.

After we achieved the final shape we added a bag lining (aka the bagging method) to the top of the surcoat and a hem facing to the bottom in the beige silk that I mentioned earlier.

The finished surcoat next to a picture of the extant garment!

I’m very happy with how this turned out in the end – it’s a beautiful surcoat! I am still considering whether or not to add trim to the bottom to make it more like the extant piece. I’ll be pulling out my sari fabric soon to do some comparisons in order to visualize the final potential product. What do you think? Should I add trim or leave it as is? Let me know your thoughts in the comments!

Home Again

We did it! After a three year town run we finally made it back to Pennsic War.

This year’s site token. We found a four leaf clover right after we trolled in!

I knew things were going to be different this year. Prior to the event my husband and I had taken over the running of our camp (Grimmsfield – N22) due to most of our usual campmates being unable to attend. I was struggling to fill volunteer shifts for Newcomers Point. I was also coordinating the schedule and retinue for TRM Atlantia again, as I had in 2019. All of this was, quite literally, keeping me up at night. Yet oddly enough – once we actually arrived – it didn’t feel like things had really changed. The details were a bit different but the atmosphere was the same. And everything that I had been stressing about prior to leaving, worked itself out by the end.

We arrived Friday, July 29th around noon. Set up went smoothly and camp was all put together in three days.

Vehicles and trailers during set up on the first day.

I was definitely nervous about how camp would run this year – if the layout would work, if we would have enough folks to help things run smoothly, if personalities would work well together, etc. So I was very happy that everything went really well in the end. While there are always a few minor hiccups at every event and even more so at a two week long event like Pennsic, there was nothing that went wrong that couldn’t be fixed or that we couldn’t work around.

After camp was all set up I opened Newcomers Point on the first Sunday.

Newcomers Point under the Watch Tent.

Usually volunteer shifts at Newcomers are about 70-80% full prior to Pennsic. This year we only managed to fill about half of the shifts, which meant a lot more folks had to volunteer on site. Luckily I had a few individuals who really sacrificed a lot of their time and effort to sit at Point every day and fill the shifts that were empty. This made my job (and life) much easier.

My husband and I being silly during one of our shifts at Newcomers.

Before leaving for Pennsic I had the idea to take a picture of what I was wearing each day – a diary or journal of garb or “outfits of the day” for the War. Of course there were several days when I forgot – despite my husband’s reminders – but I still ended up taking a lot more pictures than I usually do and that made me very happy. I exclusively wore 14th century and Roman this year, though of course all the days I forgot to take pictures were when I was wearing Roman!

The weather was so hot on some days that I opted for braes and a short tunic.
My husband does a good job of matching me when he can!
Another hot day in a simple tunic and an (obviously mundane) towel to keep my neck cool.
One of my favorite pictures from this year. I love seeing the tents set up in the background.
Tuesday of War Week we hosted a vigil in our camp. It was one of the best nights of War this year!
Our camp at night during my friend’s vigil.
Set up for the handwashing ceremony.
After Atlantian Great Court on Wednesday Night.

I love Pennsic at night. And I managed to get a few photos using my new camera phone that I am really happy with how they turned out!

View from the camp’s dayshade.
The lake at night from Casa Bardicci.

If I’ve learned one thing from my years of attending Pennsic it’s that each year is a different experience with a unique set of challenges.

Overall, it was a good year. Next year will be better!

Leaving site!


Coronets, Diadems, and Bling – Oh My!

On Wednesday, August 7th at Atlantian Great Court at Pennsic 48 I was made a Court Baroness. So, that’s cool.

Anyone who has ever asked me why I joined the SCA has received the same answer – I like to play dress up. And the exciting thing about playing dress up as a Court Baroness is that now I get to wear a fancy hat 🙂

Taken after Atlantian Great Court. The coronets pictured were a gift from Her Majesty Adelhait, made by Mistress Seraphina Maslowska.
https://www.facebook.com/itsaseraphina/
Myself and my Peer, Her Majesty Adelhait, at Stierbach’s Baronial Birthday – September, 2019.

Since Pennsic, I’ve commissioned two additional coronets and one diadem. Yes, I am extra.

My diadem was commissioned for Rip Rap War – an event held every September in the Kingdom of Atlantia. I typically wear a lot of Roman garb in the Summer due to the warmer climate of this Kingdom and so I needed a diadem to match.

This brass diadem was made by Lord Cataldo Querini and features amethyst stones and seven pointed stars to match my heraldry.

I was silly and forgot to take a picture of my entire outfit, not sitting in a vehicle. But the amethysts and stars can be seen clearly here.

My second coronet was made by Mistress Michel Almond de Champagne. It is a field coronet made from leather, wood, silver leaf, rabbit glue, pigment and clear coat. The total weight is under 13 ounces, which makes it perfect to wear outdoors over head coverings and hats.

This coronet also features my heraldic colors – purple, black, and white – as well as my seven pointed stars.

My third coronet was inspired by the funeral crown of Queen Agnes of Antioch, first wife of Béla III (1172-96), and was also made by Lord Cataldo Querini.

The funeral crown of Queen Agnes from the Hungarian National Museum. Photo credit to Kotomoi_
https://www.flickr.com/photos/kotomi-jewelry/
Another car photo, yes, but the details of the coronet are best seen here.
A photograph of me wearing the coronet with German Landsknecht in matching colors, with the talented Lord Cataldo – maker of said coronet and all around nice guy.

I’m very pleased with my coronet collection so far – they are all distinct in their makes and styles. I do have plans to commission one more in the near future, about which I am very excited! Pictures will be posted here once the coronet is completed 🙂

Roman

During the summer months Roman garb becomes quite popular in Atlantia, where temperatures can reach up to 100 degrees. Typically made from natural-fiber fabrics like linen, silk, and light weight wool, these loose fitting garments are quite effective in keeping the wearer from becoming overheated.

Roman women, or matrons, wear three layers. The first layer is the tunica, made from a light-weight linen. This layer sits closest to the skin and linen is a natural choice for helping to wick sweat from the body and keep it cool. The second layer is the stola. This layer can be made from a slightly heavier linen than the tunica, silk, or a light-weight wool. I always make my stola from patterned silk. The final layer is the palla. The palla is usually 6-8 feet long and is worn draped around the body and as a head covering. My palla is made from wool gauze.

Roman garb is incredibly simple in its patterning and construction. Both the tunica and the stola consist of two rectangles of fabric, cut to the length of the wearer from shoulder to floor, sewn up the sides. The width of the fabric can vary greatly, but must be at least as wide as the wearer’s hips. These garments can then be pinned and fitted to create a variety of styles, using a type of pin called a fibula. The palla is simply a rectangle of fabric with the edges hemmed.

A Roman Matron, photo credit to Lady Machteld Cleine. The three layers are seen quite clearly here – the light yellow tunica; the blue and gold stola; and the white palla.
My friend, Lady Marguerite, and I dressed in Roman and squinting in the sun 😉 Again, the layers are clearly distinguishable. Photo credit to Master Ursus.
Roman women in tunicas and stolas. We did not wear pallas this night.

As of June 2023, I have made numerous Roman “soft kits” that can be mixed and matched. These include six stolas, six tunicas, and three pallas.

Resources

Anna’s New Rome – https://annasrome.com/roman-garb-basics/

Greek & Roman Garb – https://www.eg.bucknell.edu/~lwittie/sca/garb/GreekRoman.html

My fibula come from ThorThor’s Hammer – http://thorthorshammer.com/romanbroochpage.htm

16th Century German

Within the last year I have grown quite fond of the Landsknecht and Kampfrau style of garb. In April of 2018, an event with a German theme – Night on the Rhine – was held in the nearby Barony of Lochmere. I decided to dress with the theme and make myself a Kampfrau dress, gollar, and wulsthaube.

For the dress, I used a pattern that I already owned and was previously used for a 16th Century Italian gown. I simply extended the waistline so that it would come several inches lower, ending at my true waist as opposed to just below my bust.

I then added guards to the bust and the skirt, which was then attached to the bust using rolled pleats.

For instructions on rolled pleats, please reference The German Renaissance of Genoveva at http://germanrenaissance.net/rolled-pleats-photo-tutorial-and-pleat-spacing-calculator/

The finished dress with detachable sleeves. The dress is 100% linen. Made by myself in 2019.
The dress, this time without sleeves, but with the gollar – a style of hood. The gollar is wool, lined with linen. Made by myself in 2019.
A close up of the wulsthaube, or head covering. I made mine using a drawstring – recommended by a friend – for ease of use. The drawstring is not historically accurate. Likewise, the fabric is a patterned blend that I purchased from JoAnn’s due to its resemblance to embroidery.
A close-up of the wulsthaube and hat.

As of June 2023, I have made two 16th century German style dresses and accessories.

Resources

Reconstructing History has several patterns for both the Kampfrau style of dress and its accessories:

https://reconstructinghistory.com/product/rh505-german-accessories/

https://reconstructinghistory.com/product/rh504-kampfrau-or-common-womans-dress/

The Curious Frau – http://curiousfrau.com/2009/08/12/trossfrau-kampfrau-and-landsknecht/

Whilja’s Corner – https://whiljascorner.wordpress.com/2013/06/04/an-overview-of-the-trossfrau/

Katafalk – https://katafalk.wordpress.com/2014/04/06/patternmaking-for-the-kampfrau-dress/

14th Century English

Baroness Margaret Lad is a 14th Century English Noblewoman. I would consider her to be my primary persona, though I often wear clothing from other countries and time periods.

When dressing as a 14th Century Englishwoman, I generally wear a front lacing kirtle (sometimes referred to as a gothic fitted dress – GFD for short); a belt, of which I have several styles; knee-high socks or stockings with garters; ankle high boots in the 14th century style; and a head covering of some sort.

I also have a variety of accessories that I like to wear. Accessories can really enhance the overall look of garb and are usually come at a nominal investment. Typically, I wear a variety of rings that are reproductions of pieces found in the 13th-14th centuries. I also have several annular and penannular brooches that I wear pinned to the chest/shoulder area of my gowns. For my belt, I like to wear a rosary or paternoster, which are found worn in illuminated manuscripts of that time period. I also have several bags that I carry so that I can hide my modern necessities.

A blue linen kirtle, made by myself, with a hood made by Historic Enterprises, bycocket – a hat typically worn in the 13th-14th centuries, belt, rosary/paternoster, and leather gloves. Photo credit to Lord Naran Numuchi.
The same linen kirtle with a red pilgrim’s bag, a shorter rosary, and no head covering – GASP! This picture was taken almost two years ago, before I realized how much covering the hair in a period style really lent itself to the authenticity of the overall look I was trying to recreate.
The same kirtle, this time with white tippets worn on the sleeves, and a coif with a frilled veil. Photo credit to Master Ursus. This series of photos shows how the same dress can be styled a variety of ways just based on accessories.
A red linen kirtle, made by myself. Worn with a belt and red pilgrim’s bag. You can see a small red paternoster hanging from my belt, as well as my pointed 14th Century shoes peeking out from the bottom of my dress. My hair is worn in a period style referred to as “hair taping“, though it remains uncovered.
Disregarding my ridiculous pose in this picture 😉 You can see the details of the rings I typically wear, along with details of this beautiful belt made by Billy & Charlie’s Fine Quality Pewter Goods. I am wearing my hair tucked into a coif under my bycocket.
A green linen kirtle, made by myself. Worn with a belt, annular broach in the shape of a heart, wimple, and frilled veil.
Another photograph of my green kirtle, credit to Lady Machteld Kleine. This is the only photograph I have where my 14th Century shoes – courtesy of Viking Leather Crafts – are visible, along with the knee-high socks that I typically wear.

In regards to the picture above, I do want to note that tucking the ends of a dress into a belt in such a way is NOT a period fashion. Typically the dress is pulled up from the waist, with the excess fabric hanging over the belt.

Patterning a Kirtle

The 14th century kirtle is typically meant to be self supporting, which means that the wearer does not need any type of supportive undergarments for the top half of the dress. In order to achieve this look, patterns need to be custom-fitted to the individual. I have had the great fortune to attend several workshops in Northern Atlantia where custom fittings have taken place, and the principles of which have also been taught, by Dame Emma West and Mistress Drea di’ Pellegrini. As a result, I not only have my own custom pattern for this style of dress, but I can fit others as well.

I have offered fittings in the past at events and hope to do so again in the future.

As of July 2023 I have made four linen kirtles using the same pattern, created for me by Dame Emma West, and two surcoats.

Resources

In the meantime, here are a list of resources for patterning and making a gothic fitted dress that may be helpful:

La cotte simple – http://cottesimple.com/

Rosalie’s Medieval Woman – http://rosaliegilbert.com/index.html

Festive Attyre – specifically the article on spiral lacing, which is used for this style of dress – http://www.festiveattyre.com/p/the-zen-of-spiral-lacing.html